
Broadcasting: mass delivery of personalised flows
- Requirements
- Step 1: Create a cutting flow
- Step 2: Personalize the flow to be sent
- Step 3: Create an output device
- Step 4: Assign the output device to the flow to be exported
- Step 5: Execute the broadcast
Broadcasting allows the mass export of personalized flows or reports to document servers or email addresses using session variables. Each recipient receives the filtered report (from a document builder for example) with only the data relevant to them.
This export can be scheduled. You can, for example, automatically send the sales indicators for each region to each manager concerned on the 1st of every month.
In this tutorial, we're going to look at an example of how broadcasting can be configured to send mass customised Flows by email. The content received by the recipients will be filtered according to the country defined for them.
To do this, we'll first create a cutting flow to define which content will be sent to which recipient. This cutting flow will take the form of a table with a column containing the recipients and one or more columns for filtering the content to be sent.
We will then customise the flow (chart or document builder) to be sent so that we can filter the content sent.
Finally, we'll configure an email output device dedicated to brodacasting, which we'll assign to the flow to be exported.
Requirements
You need a licence that includes broadcasting.
Step 1: Create a cutting flow
As mentioned above, the cutting flow takes the form of a table with a column containing the recipients and one or more columns for filtering the content to be sent. You therefore need a data model containing this information. You can consult the Table page for more details on creating a table.
The name of the columns will be used as the session variable andthe values contained in the column will be used as the values for the session variable.
In our example, we have a list of recipients with an associated country for each.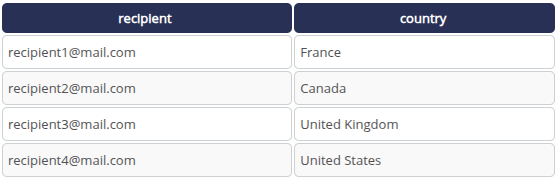
Thus :
- destinataire1@mail.com will receive the flow with the value France on the country filter
- destinataire2@mail.com will receive the flow with the value Canada on the country filter
- destinataire3@mail.com will receive the flow with the value United Kingdom on the country filter
- destinataire4@mail.com will receive the flow with the value United States on the country filter
Step 2: Personalize the flow to be sent
Here we assume that we already have the flow to be sent. The flow used could be a document builder in order to obtain an advanced report.
See the page Create a Flow page for more details.
The flow or cube (used by the flow) must be personalized with the session variable based on the name of the column used to filter the content. In our example, we will use the session variable ${session.country}.
To do this, open the flow in the Studio and add a filter rule on the dimension.
Here, we create a filter rule on the "country" dimension :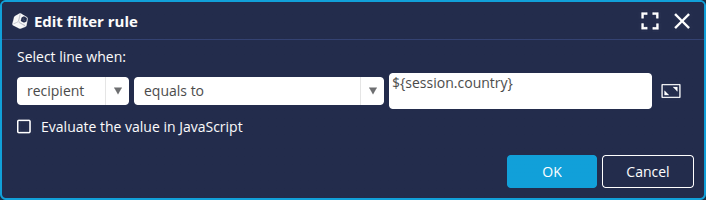
See the page Define axes and Create a filter to find out more about filters.
You can also personalize the description of the flow or cube, or the name of the exports.
Step 3: Create an output device
To enable emails to be sent, you then need to configure an email output device dedicated to this broadcast. To do this
- Create a new Mail Device in the Studio Device Manager. Go to the Device Manager page for more details.
- In the Properties tab, enter the Device name.
- In the Synchronization tab, configure the email server by specifying the session variable based on the recipients column in the cutting flow as the recipient. In our example, we will therefore use ${session.recipient}.

- In the Mail body and attachment tab , you can customize the body of the email.
- In the Broadcasting tab, select the cutting flow: type the first few letters of the flow in the Cutting flow field and select the table created in step 1.

Step 4: Assign the output device to the flow to be exported
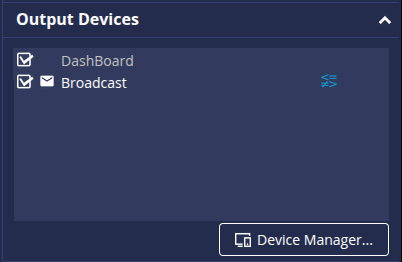
In the list of flows in the Studio, select the flow to be sent to the recipients, then in the Output devices tab of the right-hand panel, assign the Broadcast output device by ticking the corresponding box.
Step 5: Execute the broadcast
The broadcast can be run on a scheduled basis. To do this, define a refresh schedule for the flow to be sent: based on schedule, on event, etc. The broadcast will be executed according to this.
For more information on programming, see the page Schedules.
You can also run the broadcast manually: right-click on the flow to be exported in the list of Studio flows and then, in the menu, click on Synchronize.